
Thinking about building a sturdy stand for your 75-gallon aquarium? The key is creating a solid frame that can support the weight and keep everything level.
You’ll want to focus on measuring carefully, choosing durable materials, and reinforcing all joints.
Keep reading, and you’ll find all the tips you need to make a reliable, long-lasting stand.
Planning Your 75-Gallon Aquarium Stand: Measurements and Design
Planning your 75-gallon aquarium stand begins with precise measurements and a solid design plan. Start by measuring the footprint of your tank, which is typically around 48 inches long and 18 inches deep. Use these dimensions as a guide to size your stand’s top and bottom frames so the tank fits securely and is well balanced. Add about a quarter to a half inch of extra space to allow for easy installation and leveling—this small margin prevents fits that are too tight or uneven surfaces. The height of the stand usually falls between 27 and 28 inches, striking a balance between accessibility for maintenance and providing enough storage space underneath. Construct the frame with slightly larger top and bottom rectangles, such as 49 by 19 inches, connected by vertical supports at each corner. Make sure to include ventilation features, like gaps or openings, to promote airflow and avoid overheating by allowing heat to escape naturally. Proper planning at this stage ensures your stand will be both functional and visually harmonious in your room. A well-designed stand also enhances safety by supporting the weight of the tank evenly and preventing any accidental tipping. Additionally, considering structural integrity during your build can help prevent future issues related to tank stability. Being aware of the weight distribution of the tank throughout your design can further reinforce the stand’s durability and safety. Paying attention to materials selection will help ensure the longevity and stability of your DIY project.
Choosing Durable Materials for Your Stand Construction
Selecting durable materials is crucial to ensure your stand remains stable and safe for a 75-gallon tank. Use ¾-inch plywood or Baltic birch for the top panel because these materials offer superior rigidity and load distribution. For framing, 2×4 softwood lumber of #2 grade or higher provides reliable support, while 4×4 posts at load points add extra strength. Fasten joints securely with 3-inch screws and wood glue, and reinforce them with metal brackets when necessary. To combat moisture damage, apply water-resistant polyurethane or sealant to all surfaces, especially on cut edges. Choosing sturdy, moisture-resistant materials guarantees your stand’s longevity and safety, enabling it to support the significant weight of your tank over time. Additionally, considering pond liner options for durability can inspire the choice of appropriate materials for moisture resistance. Employing moisture-resistant finishes further enhances the stand’s resilience against humidity and spills, prolonging its lifespan. Incorporating moisture barriers into your construction helps prevent water penetration, thus extending the lifespan of your stand and maintaining its structural integrity.
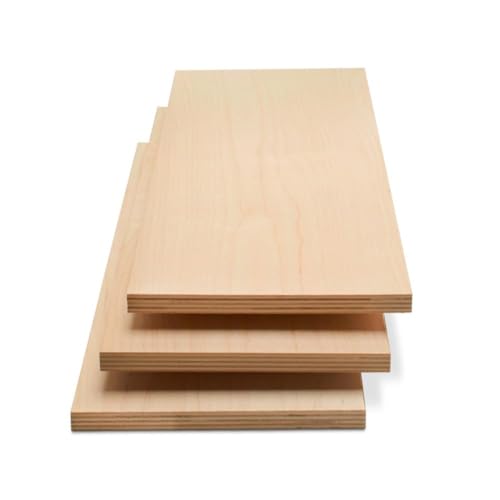
STRONG, DURABLE, HEAVY-DUTY - These craft wood pieces of multi-coated Baltic Birch plywood offer exceptional durability, rigidity, and stability for all your woodworking needs. The surfaces provide excellent holding power for glue and screws and the birch edges create cleaner joinery.

STRONG, DURABLE, HEAVY-DUTY – These craft wood pieces of multi-coated Baltic Birch plywood offer exceptional durability, rigidity, and stability for all your woodworking needs. The surfaces provide excellent holding power for glue and screws and the birch edges create cleaner joinery.

LASERABLE - Laser safe plywood for vector cutting and engraving.
Building the Frame of Your 75-Gallon Aquarium Stand
Building the frame of your 75-gallon aquarium stand begins with establishing accurate overall dimensions to ensure stability and a perfect fit. Measure carefully to determine the correct length and width, typically around 49 inches for length and 16 inches for width, though some designs may add extra length or height for specific needs. Use consistent cuts and joint techniques to make sure the top and bottom rectangles align precisely. Precise cuts are essential; a saw is your best tool for making clean and accurate segments. Always double-check your measurements before cutting to avoid mistakes that could compromise stability. When assembling the frame, use 2 1/2-inch screws to join the pieces, and clamp everything securely to prevent shifting. Check for squareness with a carpenter’s square after each corner is assembled, and use a level to verify that the corner posts are perfectly upright. Once assembled, sand all edges smooth to prevent splinters and prepare the surface for finishing or painting. Proper measurement accuracy plays a crucial role in ensuring the stand’s long-term stability and safety. Using accurate measurements and proper tools helps ensure the stand’s stability and durability over time. Paying close attention to construction precision during assembly minimizes future wobbling or structural issues. Getting the frame right early on sets the foundation for a sturdy, durable aquarium stand that can support the weight of a filled 75-gallon tank reliably over time.

Engineered for 750 LBS: A heavy duty metal frame made from 0.8 inch steel tubing; This stand is built to support a total weight capacity of seven hundred fifty pounds

Flexible Setup: This fish tank stand fits a 55-75 gallon main tank on top. The bottom level holds two 5-10 gal tank for a sump, quarantine, or supplies. Measuring 48.0" L × 18.1" W × 32.5" H, it provides reliable support and an ideal viewing height.

【Robust & Durable Construction】Crafted with steel crossbars and reinforced wood panels, this stand boasts a weight capacity of up to 1000 lbs. Its sleek dimensions—49" L x 19" W x 31.7" H—are tailored to optimize vertical space, making it an ideal fit for 55-75 gallon main tanks.
Adding Supports, Reinforcements, and Ensuring Stability
To ensure your 75-gallon aquarium stand is stable and can support the tank’s weight safely, you need to add supports and reinforcements strategically. Horizontal cross-members and diagonal bracing at 45° angles increase frame stiffness and prevent twisting under load. Proper load distribution starts by matching the stand’s footprint to the tank’s base, placing corner posts directly under major weight points so the load is transferred downward evenly. Vertical legs should be set plumb, meaning perfectly upright, to avoid side-to-side stress that can cause instability. The top platform must make full contact with the support frame to distribute weight evenly across the entire bottom of the tank. Use fasteners like structural screws, metal brackets, and wood glue to reinforce joints and strengthen the frame. Level the stand with a long spirit level and shim the legs at their bases before placing the tank, as even surfaces are essential for stability. Additionally, applying proper fastening techniques such as ensuring screws are tightly driven and joints are well-glued helps prevent movement or wobbling over time. Recognizing potential water parameter fluctuations and addressing them early can further enhance overall stability and safety. Being aware of aquarium weight distribution helps in planning the reinforcement carefully. Understanding load transfer points allows you to position supports more effectively, ensuring the entire structure bears the weight securely. These measures work together to create a durable, safe stand capable of supporting your 75-gallon aquarium securely.

BENEFITS - hygger aquarium light riser is designed to lift up aquarium light over the fish tank up to 6 inches tall, spreading the light out, making everything crystal clear and leaving no dim corner. Great for planted tank to help control alg-ae growth. It also avoids aquarium led light from getting too close to water surface, thus rising water temperature

BENEFITS - hygger aquarium light riser is designed to lift up aquarium light over the fish tank up to 8.3 inches tall, spreading the light out, making everything crystal clear and leaving no dim corner. Great for planted tank to help control alg-ae growth. It also avoids aquarium led light from getting too close to water surface, thus rising water temperature

HIGH QUALITY AQUARIUM LIGHT: Built in widened and thickened aluminum gloss shell is more beautiful and durable. Wider surface makes the heat dissipation effect of the light better. Premium 5050 and 2835 LEDs provide bright illumination for plants and fish, ehancing the aesthetic appeal of the fish tank.
Incorporating Shelves and Storage for Equipment
Incorporating shelves and storage into your aquarium stand can significantly improve organization and make equipment more accessible. To maximize space and stability, start by measuring the available vertical space between the top and bottom frames. This measurement helps you determine the optimal shelf height and prevents overcrowding. When designing your shelves, consider material weight capacity to ensure they can support the weight of equipment like filters, CO2 systems, and maintenance tools. Use sturdy materials such as plywood or MDF for your shelves to support the weight of equipment like filters, CO2 systems, and maintenance tools. Fit the shelves precisely inside the frame to minimize wasted space and ensure a clean look. Support these shelves with cleats or frame members, which should be pre-drilled to prevent splitting during installation. Consider adjustable shelves with drilled holes designed for dowels, allowing flexibility as your storage needs evolve. This adjustability makes it easier to accommodate different types of equipment or to reconfigure your setup over time. Alternatively, you can secure fixed shelves with screws after a test fit to confirm proper placement. Additionally, structural support plays a vital role in maintaining the overall safety of your stand, especially when storing heavier equipment. Properly planned shelving not only keeps your equipment organized but also facilitates easier maintenance and reduces clutter behind or around your aquarium. Paying attention to aquarium stand stability ensures that your setup remains safe and durable over time.

Fits 20 Gallon Aquarium: At 24.0”L x 11.8”W x 24.4”H, the fish tank stand fits tanks up to 20 gallons, The top bears up to 450 lb, the second shelf 150 lb. Please confirm the sizes before purchasing for your needs

Sturdy Support: This aquarium stand is crafted from high-quality wood and heavy-duty metal, featuring four metal plates on the back for robust support. It ensures stability without wobbling. The fish tank stand is durable, moisture-resistant, and easy to clean. Equipped with four adjustable feet at the bottom, it provides maximum stability for your convenience

Space Saving 3-In-1 Design: Our 30 gallon fish tank table stand features a 3 tier design. The top tier accommodates 5-30 gallon aquariums. The middle tier can be used for additional aquariums or other supplies, supporting tanks from 5 to 20 gallons. The bottom tier is ideal for storing fish food, cleaning tools, plants, books, and more. This vertical arrangement maximizes space efficiency, allowing convenient access to your essentials
Sealing and Waterproofing Your Stand to Combat Humidity
Sealing and waterproofing your aquarium stand is crucial for protecting it from the high humidity generated by your tank. Start by thoroughly preparing the surface: clean, dry, and lightly sand wood, MDF, or plywood surfaces to ensure good adhesion of the sealant. Pay special attention to edges, screw holes, and cutouts, as these are common points where moisture can penetrate. Water damage is a leading cause of stand failure, especially in worn or damaged particle board stands. Apply sealant in several thin coats rather than one thick layer, allowing each coat to dry fully before applying the next. Lightly sanding between coats helps create an even surface and enhances bonding. For wooden surfaces, use moisture barriers like waterproof paint, polyurethane, or marine varnish for durable protection. Silicone is ideal for sealing inside corners and gaps because of its flexibility and waterproof qualities. Be sure to seal all splash-prone areas and the top perimeter of the stand. Regularly inspect these sealed zones and reseal any damaged spots to maintain a strong barrier against humidity and moisture buildup over time. Incorporating proper sealant application techniques ensures a more durable and long-lasting seal. Proper ventilation and using moisture-resistant materials can also help reduce condensation issues and further prolong the stand’s lifespan.
Final Assembly, Painting, and Installing Your Aquarium
Once the frame is fully assembled, ensure it sits on a level and stable surface before installing the top platform. Use a spirit level or bubble level to check each corner and adjust the stand if necessary to prevent wobbling or twisting. Drive screws gradually, frequently checking for square alignment to maintain stability. After confirming the stand is level and sturdy, consider enhancing its appearance with decorative accents like trim, panels, or face framing. These elements can be stained, painted, or sealed with waterproof finishes to increase durability. Many DIY enthusiasts choose spray paint, especially in black, to create a sleek, inconspicuous look that conceals the framing details. Proper sealing ensures the wood material remains protected from moisture and humidity, which is crucial for maintaining the stand’s integrity over time. Applying a waterproof sealant can also help prolong the lifespan of your stand by preventing moisture damage, which can be a concern in humid environments. Once the paint or finish is completely dry, install any removable panels or doors, making sure they sit flush against the frame. Proper sealing also helps to prevent warping and deterioration, ensuring your stand remains durable over time. Finally, carefully move the stand into its designated position and place your 75-gallon aquarium on top, ensuring it rests securely on the leveled surface to support its weight evenly.
Tips for Precise Measurements and Handling Common Challenges
Accurate measurements are crucial to ensuring your stand is stable and level for your 75-gallon aquarium. Begin by measuring the actual footprint of the tank, not just the nominal dimensions listed on the manufacturer’s label, as manufacturing tolerances can vary. Use these measurements to create a detailed plan that reflects the real size and shape of your tank. When assembling the stand, secure connections with hydraulic joints and adhesive bonding, which provide tight, durable fits that won’t shift over time. Always double-check that the top and bottom frames are perfectly square before fastening—they must be true to avoid transferring any racking errors to the support surface. When cutting notches or braces, set your saw depth carefully, around 1 1/2 inches, to avoid weakening the structural integrity. After assembly, re-measure everything and use shims along with a level to confirm the stand sits flat and even before placing the aquarium on top. Proper measurement techniques are essential for preventing future instability or wobbling issues.