
Thinking about building your own 55-gallon aquarium stand? You can create a sturdy, custom support using affordable materials like 2x4s and plywood, ensuring your tank stays safe and stable.
When done right, a DIY stand not only saves money but also lets you tailor it to your space. Keep reading to learn how to build one step by step.
Why Build Your Own 55-Gallon Aquarium Stand?
Building your own 55-gallon aquarium stand is a smart choice for cost-conscious hobbyists. DIY stands typically require only basic materials like 2×4 lumber and simple fasteners, which are much cheaper than retail stands that often include cabinetry or branding. This approach allows you to save significantly on expenses while still creating a sturdy platform for your tank. Additionally, constructing your own stand enables you to use reinforced support structures to ensure it can safely hold the weight of multiple tanks, making it a safe and reliable option. Proper weight distribution is crucial to prevent accidents, and a DIY stand gives you full control over this aspect. You can also incorporate customized support designs to match your specific weight distribution needs, further enhancing stability. Proper customization also improves weight distribution and stability, crucial for the safety of your aquarium. If your setup evolves or your needs change, a DIY stand offers flexibility for modifications or reinforcement without the need to replace the entire structure. Incorporating precise measurements during construction can help prevent wobbling and uneven weight loads, ensuring longevity and safety. This adaptability ensures your investment remains functional over time, and you can make adjustments with simple tools. Overall, building your own stand balances affordability, personalization, and long-term usability.
Choosing the Right Materials for Your DIY Aquarium Stand
The best materials for a DIY aquarium stand are plywood and dimensional lumber, specifically 3/4-inch or 1-inch thick plywood. These materials provide strong support that can handle the weight of a 55-gallon tank and resist warping over time. Plywood can be sealed with moisture-resistant finishes to improve durability against humidity and spills. Choosing the right materials ensures long-lasting stability and safety for your aquarium. Dimensional lumber like 2x4s and 4x4s is ideal for framing because it is sturdy and readily available. Choose straight, minimally twisted pieces to ensure stability and a level surface. Fasteners such as screws combined with wood glue create tight joints that can withstand daily use. To protect your stand from moisture, apply sealants, paints, or waterproof coatings. These finishes help prevent the material from soaking up humidity, which can lead to warping or deterioration. You can also add foam supports underneath the stand to help level it and distribute the tank’s weight evenly across the base, preventing stress points and increasing overall stability.

Sturdy Support: This aquarium stand is crafted from high-quality wood and heavy-duty metal, featuring four metal plates on the back for robust support. It ensures stability without wobbling. The fish tank stand is durable, moisture-resistant, and easy to clean. Equipped with four adjustable feet at the bottom, it provides maximum stability for your convenience

Suitable for large fish tanks: Our fish tank stand is designed for 20-29 gallons of fish tanks, providing stable support and a secure display space. It is also equipped with two additional compartments on the right side, with the bottom compartment capable of holding 5 gallons of small fish tanks, allowing you to create a more diverse aquatic environment. Whether you're raising large ornamental fish or arranging aquatic plants, our stand can meet your needs.

Flexible Setup: This fish tank stand fits a 20-29 gallon main tank on top. The bottom level holds a 5-10 gal tank for a sump, quarantine, or supplies. Measuring 31.5"L x 15.7" W x 32.5"H, it provides reliable support and an ideal viewing height.
Measuring Your Tank and Planning Support Placement
Measuring your tank accurately and planning support placement are crucial steps before cutting or assembling your stand. Start by confirming the height of your aquarium, which generally ranges from 20 to 21 inches, and record its footprint, approximately 48 inches long and 13 inches wide. Use these measurements to select a stand style that can support the full weight of the filled tank, which for a 55-gallon aquarium is over 600 pounds. Ensure support points align under the entire perimeter of the footprint to prevent stress on the glass, especially in the center. It’s also wise to add a few inches—about 1 to 2 inches—to the stand’s length and width for equipment clearance, making it roughly 52 to 53 inches long and 17 to 18 inches wide. Accurate measurements guarantee a stable, secure base and help you choose a stand that fits your space and meets your needs. Additionally, considering support placement and the distribution of weight will help prevent potential damage or accidents.

Suitable for 55-75 Gallon Fish Tanks: Our large farmhouse fish tank stand measures 52” D x 19.7” W x 31.4" H, and is able to hold 2 aquariums and is very suitable for large 55-75 gallon aquariums and multiple sizes of fish tanks. The bottom 20" D x 13" H space is also for you to place additional small 10-20 gallon terrariums or fish tank kits, etc.

COMPLETE GLASS AQUARIUM KIT*: The kit includes a 55-gallon glass tank with two hinged hoods for easy access, white LED lights, a Tetra Whisper PF60 Power Filter with two Tetra Large Bio-Bag Filter Cartridges, a 200-watt Tetra heater, a thermometer, a fish net, a Tetra AquaSafe water conditioner sample, a TetraCare brochure and an aquarium set-up brochure.
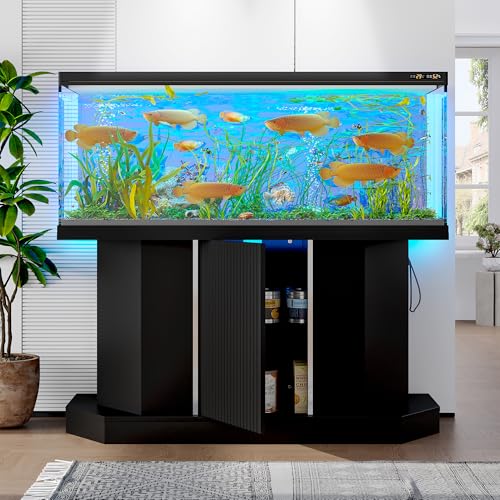
⭐️【Perfect Fit for 55 - 75 Gallon Tanks】:This heavy-duty aquarium stand is engineered to securely support 55 gallon and 75 gallon fish tanks, with an impressive 880 lbs weight capacity. The spacious desktop (47.64" x 14.17") provides a perfect foundation for your aquarium setup.
Building a Strong and Level Frame for Stability
A strong and level frame is crucial for supporting the weight of your filled aquarium and maintaining stability over time. Start by constructing a rectangular perimeter frame with continuous top and bottom rails, which helps prevent racking or twisting under load. Use thicker structural members such as 4×4 posts or reinforced 2×4 and 2×6 framing to ensure better load distribution and increased stiffness. During assembly, keep joints flush and square to ensure an even transfer of load without any twisting at the corners. Incorporate vertical supports beneath the top frame to direct the weight straight down, preventing bent or cantilevered members that could cause instability. Build the frame on a flat, level surface and verify alignment after tightening all connections. Proper structural integrity relies on proper design and craftsmanship to resist various stresses over time. A well-designed frame also takes into account load-bearing capacity to ensure the entire structure remains safe under the weight of a filled aquarium. Incorporating proper design principles is essential for creating a durable and reliable stand. Finally, add diagonal corner bracing to resist sway, help maintain the frame’s shape, and distribute the load more effectively, reducing the risk of sagging or deformation over time. Ensuring a sturdy base is essential for long-term durability, as it provides a solid foundation that minimizes the potential for future structural issues.

Unique Design: Handcrafted wooden frame featuring intricate engraved designs of fish and plants for a rustic, artistic look

Spacious & Versatile Aquarium Stand: Accommodating a 40-120 gallon aquarium, the 48.8''L x 24''W top surface supports most standard tanks with a 1,100 lbs weight capacity. The bottom shelf provides additional space for 10-gallon aquariums, making the most of your available space.

Heavy-duty Fish Tank Stand: Aquarium stand is engineered with a sturdy X-cross metal frame and adjustable foot pads, providing exceptional stability on uneven floors; Fish stand desktop weight capacity is up to 220 pounds, while the bottom shelf can hold up to 66 pounds; With strong weight-bearing capacity, ensure your fish tank is safe and stable
How to Support the Edges of Your Aquarium and Distribute Load
To ensure your aquarium remains stable and evenly supported, you need to provide full perimeter edge support on the stand. This means every part of the tank’s edge should be supported by the frame, not just the corners. Proper edge support distributes the load evenly across the entire bottom perimeter, preventing stress points that could lead to cracks or leaks. Verify that your stand has a flat, level surface, preferably with a continuous plywood top, to avoid gaps or uneven contact that could cause the tank to twist or wobble. Using rigid foam underneath the tank helps distribute weight uniformly and absorbs minor surface irregularities, adding stability. Additionally, design your stand with direct wood-to-wood contact from the support area down to the floor, ensuring vertical members are aligned beneath the tank edges. This setup promotes efficient load transfer and long-term stability of your aquarium. Incorporating proper load distribution techniques is essential for preventing structural issues over time. Implementing quality aquarium filters can also enhance water quality and overall tank health, contributing to a safer environment for your aquatic life.

Universal Compatibility: Designed for all open fish tanks and pet boxes providing reliable support without tension for glass covers up to 12mm thickness


Customizable Height: Adjust the height of your aquarium divider with each support foot adding 1.8 cm for precise water level control and habitat separation
Adding Vertical Supports and Reinforcements for Safety
Adding vertical supports is crucial for creating a continuous load path that safely transfers the weight of your aquarium to the floor. Support brackets placed at the corners ensure direct contact between the wood components, which is essential for stability. These supports should be securely fastened to both the top and bottom frames using screws and glue to prevent gaps that could weaken the structure. A well-designed support system also incorporates material strength to ensure that supports do not bend or break under load. When installing supports, position them consistently at the corners and intermediate points to distribute the load evenly across the stand. Proper reinforcement helps your aquarium stand remain stable under the approximately 600 pounds of a full 55-gallon tank, with proper engineering ensuring the structure can withstand long-term use. Incorporating structural integrity principles during construction will further enhance the durability and safety of your DIY stand. This minimizes the risk of wobbling or collapse, ensuring safety and durability over time.
Finishing Your Stand With Paint, Sealant, and Padding
Before applying paint or sealant to your stand, thorough surface preparation is crucial. Clean all dust, oils, and residues with a damp cloth to ensure a contaminant-free surface. Sand glossy surfaces like laminate or varnished wood to improve bonding, and consider deglossing for better adhesion. Remove hardware and detachable parts to allow for an even coat and prevent drips. For decorative finishes, opt for oil-based paint or acrylic enamel to guarantee durability and water resistance, and avoid unstable additives that could compromise quality. Use a primer on raw or porous areas, applying thin coats and lightly sanding between layers to achieve a smooth, even finish. Seal your stand with weatherproof coatings such as polyurethane or epoxy, applying multiple coats for maximum protection. Additionally, applying proper surface prep techniques, such as deglossing and sanding, can significantly improve the longevity and appearance of your painted stand. Incorporating surface material knowledge helps in selecting the most compatible paints and sealants for optimal results. Using the correct surface preparation methods can also help prevent future peeling or chipping of the paint, ensuring your stand remains attractive over time. Proper moisture-resistant padding further protects your stand by evenly distributing the aquarium’s weight and preventing damage.

Vivid Glow in the Dark Effect: These acrylic paints absorb light and glow brightly in darkness, creating stunning luminous effects for Halloween decorations, bedroom starry skies, rave posters, and DIY art projects

[Sturdy Construction]The Fish Tank Stand is made of heavy-duty steel frame and black baking paint process, which is sturdy and stable, waterproof and rustproof. One side also has added triangular brackets for extra strength and stability.bearable 660 pounds of weight.

15- TO 20H-GALLON AQUARIUM STAND: Fits aquariums with up to a 27” by 15” base
Making Sure Your Stand Fits and Is Stable Before Adding Water
Ensuring your stand is properly fitted and stable is essential before filling your aquarium. Start by checking that the top surface is flat, continuous, and square. It should match or slightly exceed the tank’s footprint to provide proper support and prevent stress points. Inspect the stand for warped sections or gaps, which can compromise stability and aesthetics. Use a carpenter’s level to verify the stand sits evenly in all directions; small height differences can be corrected with non-compressible shims placed underneath. Test for wobble by gently applying pressure at each corner—any movement indicates weak points that need tightening or adjustment. Confirm that the load is evenly distributed, especially on a solid, level surface like concrete. Stability and material durability are crucial to prevent leaks or accidents, ensuring your aquarium remains safe and secure. Additionally, understanding the importance of a properly supported stand can help prevent future issues and ensure the safety of your setup.
Tips for Proper Installation and Maintenance
Proper installation and maintenance of your aquarium stand are essential to ensure safety and durability. Begin by assembling the stand on a flat, level surface; use a spirit level to confirm the evenness before placing the tank. If the surface is uneven, employ furniture shims or adjustable feet to achieve perfect leveling. Support the entire perimeter edge of the tank evenly, making sure to maintain direct contact between the wood and the tank to distribute weight properly.
Apply water-resistant, aquarium-safe sealant to exposed surfaces to protect against water damage. Focus on areas prone to moisture, such as corners and joints. To enhance aesthetics, you can add decorative accents or choose alternative finishing options that also help resist moisture over time. Regular inspections are also recommended to prevent potential issues and prolong the stand’s lifespan.
Inspect the stand regularly—every six months is recommended—to check for signs of moisture damage, warping, or loose joints. Reapply sealant as necessary to maintain a protective barrier. If you notice side-to-side movement, tighten screws securely and consider adding diagonal bracing to improve stability. Additionally, understanding the importance of proper support can greatly improve the stability and safety of your aquarium setup. Regularly verifying that the waterproofing measures are intact will help safeguard your stand against water damage over time. Consistent support and upkeep not only extend the life of your stand but also keep it secure and visually appealing.
Troubleshooting Common Issues During Build and Use
Structural wobble is a common issue during the building or use of your aquarium stand, and it should not be ignored. Wobbling typically indicates uneven legs, a floor that isn’t level, or a frame that isn’t square. If the stand rocks on diagonals, it may suggest twists or warping that weaken stability, risking cracks and leaks under the full water weight. To fix this, add gussets or extra bracing to reduce racking and ensure corner supports transfer the load directly downward. Carefully level the stand using non-compressible shims to prevent uneven pressure points that could lead to leaks or algae growth. Proper load distribution is essential to maintaining stability over time. Using a leveling tool can help achieve precise adjustments for a more stable setup. Persistent wobbling or movement during use can cause increased water evaporation and promote algae buildup. Address these issues promptly by tightening supports, verifying load paths, and correcting frame alignment to maintain a safe, stable environment for your aquarium. Additionally, sealing or reinforcing joints can prevent further warping and ensure long-term stability of the structure.