Ever wonder how to build a sturdy, safe stand for your aquarium without spending a fortune? The key is choosing the right materials and ensuring the structure can support the tank’s weight comfortably.
Once you get the basics down, creating a custom stand is straightforward and satisfying. Keep reading to learn the step-by-step process to craft your own durable aquarium stand.
Plan Your Aquarium Stand Dimensions and Layout
To plan your aquarium stand accurately, start by measuring the tank’s footprint—the length and width of the glass sides. These dimensions determine the stand’s base size and should match the tank exactly for secure support. Allow a small margin if needed, but avoid excessive wiggle room. Remember, the top frame of the stand should be based on the tank’s outside dimensions, not the interior glass measurements. Record the height of the tank as well, to ensure the stand’s overall height supports comfortable viewing and access.
Consider the total weight of the entire system, including water, substrate, and decorations. Calculate this carefully to confirm the floor can support the load over time. Make sure to include access points for maintenance and adequate ventilation to prevent heat buildup or moisture buildup inside the stand. When designing the frame, sketch out your layout or create a 3D model for accuracy. Prepare a precise cut list based on these plans. Finishing the wood properly enhances the stand’s appearance and allows you to incorporate decor elements seamlessly into your aquarium setup. Additionally, assessing the weight capacity of your stand and floor ensures a safe and stable setup for your aquatic environment. To further ensure stability, it’s wise to research the floor’s load-bearing capabilities before finalizing your design. Also, understanding the aquarium’s weight helps in planning for a durable and secure stand.
Choose Materials for a Strong, Durable Support
Choosing the right materials is key to creating a support that is both strong and durable. For maximum strength, metal options like steel or aluminum are ideal, especially when paired with a sturdy top surface. Solid wood, like kiln-dried hardwood, provides excellent stability and resistance to warping, unlike green or warped boards. Structural lumber such as 2x4s is a cost-effective alternative that offers good support when properly joined. Softwoods like pine or Douglas fir graded as #2 or better are suitable options for frames, offering a balance of strength and affordability. Using appropriate finishes like sealants or paint also helps protect the materials from moisture and extends the life of your stand. Plywood, particularly marine-grade or Baltic birch, excels for the top and panels because of its water resistance and stability. Sealing these panels with marine varnish, polyurethane, or specialized sealants significantly reduces water damage over time. Metals like steel or aluminum can provide a high load capacity and added stability, especially if you use a well-supported top surface. For enhanced longevity, always seal exposed surfaces with appropriate finishes, which help prevent water intrusion and extend the lifespan of your support structure.

Sturdy Support: This aquarium stand is crafted from high-quality wood and heavy-duty metal, featuring four metal plates on the back for robust support. It ensures stability without wobbling. The fish tank stand is durable, moisture-resistant, and easy to clean. Equipped with four adjustable feet at the bottom, it provides maximum stability for your convenience

【Multi-Tier Fish Tank Stand】 This heavy-duty 29 gallon aquarium stand features a spacious 36.81×15.75-inch top platform, designed to securely hold 20-37 gallon tanks. The steel-reinforced shelves below provide sturdy storage for 5 gallon fish tanks—perfect for neon tetras, bettas, or specialized setups like quarantine/hospital tanks and species segregation. A must-have for serious hobbyists who value both functionality and professional-grade organization

✅ Sturdy & Durable Construction: Built to support 15-gallon tanks with ease, ensuring stability for your aquarium and its inhabitants.
Construct the Frame Step-by-Step for Stability
To build a stable frame, start by laying out the top and bottom rectangles precisely to match your aquarium’s footprint. Use sturdy materials such as plywood, hardwood, or metal that offer both strength and visual appeal. Dry-fit all frame members on a flat, level surface, checking that the corners stay square and the joints fit tightly. Pre-drill screw holes to prevent splitting of the materials and make fastening more accurate. Selecting the right materials is crucial for ensuring the stand’s durability and safety over time. Join the corners with screws and, if recommended, apply glue to reinforce the joints and minimize movement. Attach vertical legs at load-bearing points, ensuring they sit directly beneath the frame corners to effectively transfer weight. Connect the bottom frame last to lock the entire structure into a single unit. Before placing the tank, verify the entire frame is square and level, making adjustments with shims as needed. Always double-check the levelness of the assembled frame to ensure proper support. Consider using a spirit level to accurately check for evenness throughout the construction process. Incorporating extra support beams can enhance the overall stability and weight distribution of the stand. Test the stability by gently pressing on different areas to confirm it remains steady.

Sturdy Support: This aquarium stand is crafted from high-quality wood and heavy-duty metal, featuring four metal plates on the back for robust support. It ensures stability without wobbling. The fish tank stand is durable, moisture-resistant, and easy to clean. Equipped with four adjustable feet at the bottom, it provides maximum stability for your convenience

Suitable for large fish tanks: Our fish tank stand is designed for 20-29 gallons of fish tanks, providing stable support and a secure display space. It is also equipped with two additional compartments on the right side, with the bottom compartment capable of holding 5 gallons of small fish tanks, allowing you to create a more diverse aquatic environment. Whether you're raising large ornamental fish or arranging aquatic plants, our stand can meet your needs.

ULTIMATE STABILITY FOR 20-37 GALLON TANKS: Built with a reinforced metal frame and a unique 6-leg support system, this aquarium stand ensures balanced weight distribution. It provides a rock-solid foundation for a 20 gallon fish tank stand, 29 gallon, or 37 gallon aquarium tank, supporting up to 400 lbs without sagging.
Reinforce Your Stand to Safely Support Heavy Loads
Reinforcing your aquarium stand is crucial for safely supporting heavy loads. Proper load distribution prevents the weight from concentrating on weak points, reducing the risk of sagging or cracking. Adding extra vertical supports or supports that transfer load directly to the floor helps achieve this. A sturdy box structure with top and bottom frames, connected by vertical uprights, enhances the stand’s compressive strength. For wider stands, midspan supports are essential to minimize flexing. Reinforcements such as doubled members or internal skeletons stiffen weak spots and prevent long-term deformation. Cross-bracing and gussets also increase lateral stability, ensuring the stand remains secure under heavy, sustained loads. Understanding load capacity is fundamental to making safe and effective reinforcements. Properly assessing your aquarium’s weight and the stand’s design helps prevent material fatigue, which can cause structural failure over time. Using proper tools and techniques during reinforcement ensures connections are secure, further boosting the stand’s durability. Implementing proper reinforcement techniques can significantly extend the lifespan of your stand and ensure safety.

VIVO Reinforcement Brackets: We create affordable solutions designed with creativity and quality to transform your unique workspace. This product is a steel reinforcement bracket kit that adds extra support to your desk clamp and monitor setup
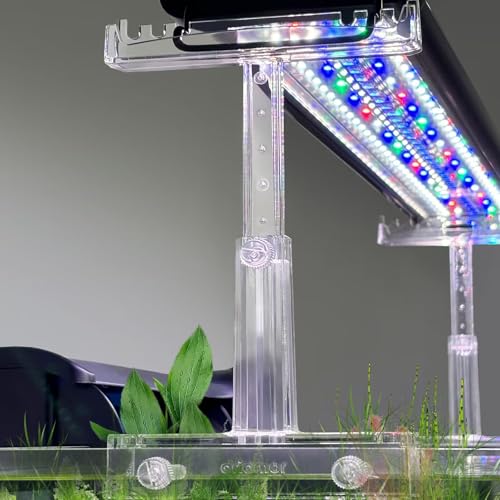
Better Compatibility: Compare with the regular riser, The plus one is best compatible with bigger fish tanks with rim thickness less than 3CM,Our aquarium light holder adopt clear acrylic material, it stands seems to blend in with your fish tank, it will not prevent you from enjoying the view of your fish tank. For aesthetics, we offer 3 sizes of screws to fix the pedestal, please choose according to your fish tank thickness

Product Name: T-shaped Glass Fixing Clip; Fit for Glass Thickness: 4-8mm / 0.16"-0.31"
Ensure Your Top Surface Is Flat and Level
To ensure your stand’s top surface is flat and level, start by placing a bubble level across multiple points, including each corner and the center. Check for dips or high spots by observing the bubble’s position. Using a straightedge can help identify uneven areas that the level alone might miss. If the surface isn’t flat, do not proceed until it is corrected. Shim low areas with thin pieces of material or adjust the leveling feet gradually, then recheck to confirm the surface remains level in all directions. Repeat this process after making adjustments, especially once the weight of the tank is added. Only begin filling the aquarium once the top surface is truly flat and level, providing even support and stability to prevent stress on the tank and stand. Ensuring proper water parameters can also help maintain a healthy ecosystem and prevent structural issues over time.
Secure the Tank and Add Storage or Aesthetic Features
Securing your aquarium and stand effectively prevents accidents and protects your investment. Use nylon moving straps or earthquake straps attached to wall studs with at least 2-inch screws. Drill pilot holes to prevent wood splitting and employ two straps for even load distribution. Adding washers or grommets at attachment points minimizes tearing. Reinforce the stand with corner braces, stainless steel brackets, or ratchet straps, especially in areas prone to earthquakes. Secure the tank to the stand with screw-in clips or Velcro strips—ensure they are snug but not overtightened to avoid stress or cracks. Incorporate storage options for lighting, water filtration, and other supplies to keep everything organized and accessible. For aesthetic enhancements, consider painting or adding overhanging edges that improve appearance without compromising stability. Additionally, material flexibility in the stand construction helps absorb seismic forces and prevent damage during ground movement. Incorporating proper installation techniques further ensures the safety and durability of your habitat setup. It’s also essential to consider exact tank dimensions and capacity when designing your stand to ensure a perfect fit and optimal support. Understanding weight distribution principles can help maintain structural integrity over time.

Flexible Nylon Straps Stop Top-Heavy Items Such As China Cabinets, Wall Units, Entertainment Centers From Toppling Over

HELPS SECURE TOP HEAVY FURNITURE: QuakeHold! Furniture Straps help stabilize bookcases, cabinets, entertainment centers, shelving units, dressers, file cabinets and other tall furniture to help reduce tipping during earthquakes, accidental impacts or movement.

Peace Of Mind With Furniture Wall Anchors: This metal furniture straps are designed to withstand earthquakes,windstorms and also babyproofing. The metal anti tip furniture strap will secure your furniture up to 400 lbs so you can be assured that your baby won't be the victim of unnecessary injury in your own home. Never again will you worried about the injuries that could crush or seriously injure your little one
Double-Check and Finalize Your Stand’s Stability and Safety
To ensure your stand’s stability and safety, start by verifying that it can support the entire aquarium system reliably. Confirm the load capacity exceeds the total weight of water, substrate, and equipment by at least 20 to 30 percent to provide a necessary safety margin. Perform a static load test by placing weights equal to 50 to 120 percent of the final tank load on the stand for 24 to 48 hours. During this time, check for any frame deflection using a straightedge to detect subtle warping or bending. Recheck the levelness and support points, especially on uneven floors, by adding shims or using a rigid base panel to achieve proper contact. Additionally, research how aquarium stands are tested for safety to better understand what standards to look for. Test the frame’s rigidity by applying lateral force with your hands or a tool, and inspect all braces and fasteners. Tighten any loose connections and look for signs of corrosion or wear that could compromise strength over time. Ensure the stand’s top surface offers even contact across its entire length, providing a stable platform for the tank. The surface should also have a clean, aesthetic design, with electrical wiring securely fastened and concealed to prevent hazards. Properly securing wires and hiding them from view reduces the risk of accidental damage or water contact, ensuring safety and neatness.